- Home
- Expression Web Tutorials
- Installing Expression Web 4
- Setting Up Expression Web 4.0
- Create New Website
- Create a Blank Web Page
- Create a Webpage Layout
- Adding Horizontal Top Navigation
- Adding Vertical Navigation
- Validating Your Pages
- Creating an Expression Web Dynamic Web Template
- Publishing Your Web Site
- How to back up your local website on your hard drive
- SEO Checker and Report
- Adding Insert Include Code into Code Snippets
- Auto Thumbnail in Expression Web
- Broken Dynamic Web Templates and hidden metadata files
- Code Snippets in Expression Web
- Compatibility Checker on Status Bar in Expression Web
- Create and Style a Data Table
- Creating a New Font Family Group
- Creating a New Page from Hyperlink Properties
- Creating web site from site templates in Expression Web
- CSS Properties panel
- Expression Web Preview in Browser
- Expression Web and Design Time Includes
- How to back up your local website on your hard drive
- How to create a Personal Web Package
- Import Site Wizard in Expression Web
- Importing your folders/files into Expression Web
- Inserting Images in Expression Web
- Interactive Buttons in Expression Web
- Migrating a FrontPage Site to Expression Web
- Modify Style Dialog Box
- New Style Dialog Box
- Publishing Your Website from the Remote Server with FrontPage Server Extensions
- Editing Reusable Forms
- Troubleshooting Image Problems in Expression Web
- Validation Error - no attribute "xmlns:v"
- Web Album Generator and Expression Web
- What are all the style# in my page?
- Zoom Search and Expression Web
- Working With Left Border Background Images
- Resources
- Templates
- Web Design Tutorials
- Accessible Forms
- Add a Search Box
- Adding Google Search
- Accessible Data and Layout Tables
- Responsive Tables
- Anchor Tags and Name Attributes
- Best Font Size for Web Design?
- Center Page in Browser Window
- HTML Lists
- How to create and extract a Zip File in Windows
- How to Create a Self-Extracting Zip File
- Validation Error - no attribute "xmlns:v"
- Working With Left Border Background Images
- Handle Background Transparency in Snagit Editor Like You Would in Photoshop
- Bluehost Tutorials
- Add-on Domains at BlueHost
- BlueHost 301 Redirects
- BlueHost Webmail
- Customizing BlueHost Error Pages
- How to make a subfolder the main folder for your BlueHost main domain
- How to change the Primary Domain
- Installing a WordPress Blog Using Simple Scripts
- Mannaging SSL on BH
- Password Protecting Directories and/or Files with Bluehost
- Server Side Includes, BlueHost, and Expression Web
- Expression Web Addins

How to Manage AutoSSL on BlueHost
All Bluehost customers have a free shared SSL Certificate available through Let's Encrypt for all assigned and parked domains and subdomains. These should install and activate themselves.
Most of the free SSL Certificates are issued for a period of 90 to 360 days and, therefore need to be renewed each time this period expires. If you get a paid SSL Certificate, then you can get it for 1, 2 or 3 years, and you only have to renew it when it expires.
https://my.bluehost.com/hosting/help/manage-autossl
Enabling Bluehost’s free SSL is quick and easy. By enabling an SSL for your website, your domain will be given the "HTTPS://" prefix, which means your website will be labeled as "secure" in most web browsers. This article will help guide you through enabling or disabling the Free SSL provided by Bluehost.
How to Enable Free SSL for Non-WordPress users
Step 1: Log in to your Bluehost dashboard, and navigate to the SSL Certificate product page.
Step 2: If the Free SSL (AutoSSL) is currently disabled, choose the domain you would like to install to in the upper right-hand drop-down box Install SSL on
Step 3: Click Enable AutoSSL.
Once the Free SSL (AutoSSL) is enabled, you may need to add a redirect to ensure the domain resolves to the HTTPS protocol.
![]()
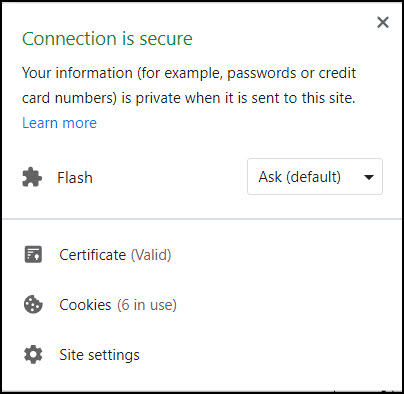
If you click on the padlock icon, you can see the information on your site.
How to Enable Free SSL for WordPress users
Step 1: Log in to your Bluehost dashboard, and navigate to the SSL Certificate product page.
Step 2: If the Free SSL (AutoSSL) is currently disabled, choose the domain you would like to install to in the upper right-hand drop-down box Install SSL on
Step 3: Click Enable AutoSSL.
Step 4: Once the Free SSL (AutoSSL) is enabled, navigate to the Security tab in the My Sites section of your dashboard.
Step 5: Under Security Certificate, ensure that toggle switch is On.
Step 6: Test to make sure your SSL certificate is working by typing in your domain name and navigating to your website. You should see HTTPS:// appear before your domain name and any subsequent pages on your site.
If you still do not see your website as “secure,” you will need to contact the BH support team.

As you can see by the above screenshot, my wp blog showed as Not Secure. After a chat session with BH were the Really Simple SSL plugin was installed, the site now shows as secure.

Adding a Redirect in the File Manager
Once the Free SSL (AutoSSL) is enabled, navigate to the File Manager section of your dashboard.
Locate your .htaccess file. The primary .htaccess file is located in your public_html folder. To learn more about accessing this file, please see our .htaccess Tutorial.
Click on the file to open your Code Editor.
Using the Code Editor, add these lines to the beginning of your .htaccess file:
#redirect all http to https and permanently redirect from
non-www to www
<IfModule mod_rewrite.c>
RewriteEngine On RewriteCond
%{HTTPS} off [OR]
RewriteCond %{HTTP_HOST} !^www\.
RewriteRule (.*)
https://www.expression-web-tutorials.com/$1 [R=301,L] </IfModule>
Note: Substitute example.com with your domain name.
The above code will redirect all http to https AND redirect all non-www to the www version of your site.
The following code in your .htaccess file handles the auto ssl renew
# sets auto ssl renew
RewriteCond %{HTTP_HOST}
^expression-web-tutorials\.com$ [NC]
RewriteCond %{REQUEST_URI}
!^/\.well-known/acme-challenge/[0-9a-zA-Z_-]+$
RewriteCond %{REQUEST_URI}
!^/\.well-known/cpanel-dcv/[0-9a-zA-Z_-]+$
RewriteCond %{REQUEST_URI}
!^/\.well-known/pki-validation/[A-F0-9]{32}\.txt(?:\ Comodo\ DCV)?$
RewriteRule ^(.*)$ http://www.expression-web-tutorials.com/$1 [R=301,L]
Test to make sure your SSL certificate is working by typing in your domain name and navigating to your website. You should see HTTPS:// appear before your domain name and any subsequent pages on your site.
If you still do not see your website as “secure,” please contact the BlueHost support team.
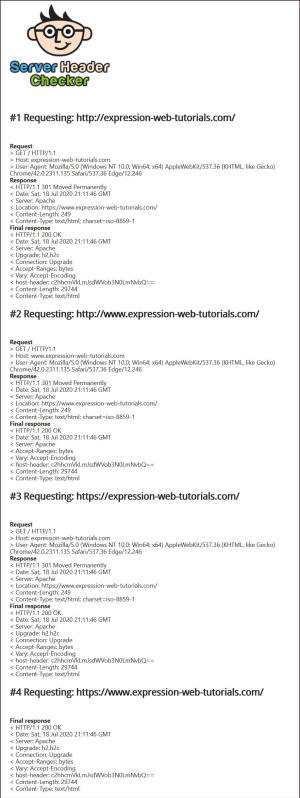
If you want to check and see if your site is working as it should for redirects, you can use this tool http://tools.seobook.com/server-header-checker/
Plug in all four versions of you site url

And you should get something like this screenshot as a result. CLick on the thumbnail to see the larger report.
Expression Web 4.0 Tutorials 2nd Edition from Install to Publish, a FREE EBook by Pat Geary.
Expression Web has a group on Facebook. If you are a FB user, come join us.
Disclosure: This is an affiliate link, which means that if you visit Bluehost.com through this link and purchase this product, I’ll get a commission.

April 2007 - April 2013
Privacy Policy | Migrating from FrontPage to Expression Web
Microsoft® and Expression Web® are registered trademarks of Microsoft® Corporation.
Site Design & Maintenance : Expression Web Tutorials & Templates
